
MineBrush publication
Minecraft Skin Layers: Make Better Hair, Jackets, Glasses & Outfits
Give your Minecraft skin clearer hair, jackets, glasses and cuffs. Learn base versus outer layers, build a first jacket, fix seams and apply the right Classic or Slim model.
The outer layer is how a simple Minecraft skin gets a raised fringe, a jacket collar, glasses or chunky cuffs. You paint the character underneath on the base layer, then add selected details to a slightly larger surface around it. Used carefully, those few extra pixels can make your outfit much easier to recognize in multiplayer, screenshots and third-person play.
This guide covers ordinary 64×64 player-skin PNGs with Classic or Slim arms. It is a practical way to improve your own character, make matching team outfits or create a seasonal version without redrawing everything. Bedrock Character Creator accessories and custom model geometry are separate systems.
What belongs on each layer?
| Base layer | Outer layer |
|---|---|
| A complete face, hair underneath a hat and the main outfit | Fringe, hat edges, glasses and small face accessories |
| Shirt, trousers, hands and feet that still look finished alone | Jacket edges, pockets, cuffs, boot trim and straps |
| Your character’s main color blocks and identity | Selective depth and optional outfit details |
The layers are stored in different parts of the same PNG. You do not upload a second image for a jacket. Also, an editor’s paint-layer panel may mean something different: always find its Base/Body and Outer/Overlay controls for the Minecraft model.
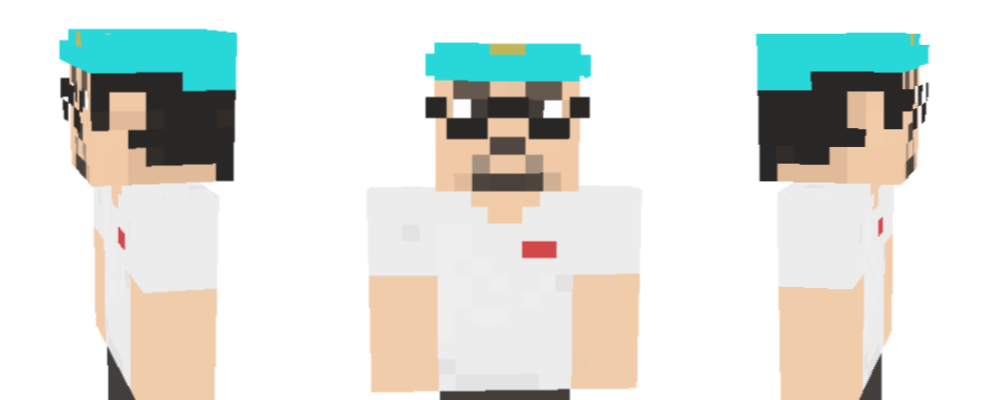
Choose Classic or Slim before painting sleeves
Classic arms are four pixels wide across the front; Slim arms are three. Pick the model in your skin editor first and use the same choice when applying the finished skin. Painting for one model and selecting the other can shift sleeve details or expose unwanted pixels.
Import your existing skin or start from the editor’s player template. Keep a copy before experimenting. Use a one-pixel pencil or brush at native resolution; smooth painting and resizing can blur the edges that make a Minecraft skin readable. A 3D preview helps you see where the flat image wraps around the body.
A first project: a jacket over your existing outfit
Start with a simple jacket rather than trying to decorate every body part at once. The goal is a finished shirt underneath, a clearly open front and cuffs that continue around each wrist.
- Finish the base outfit. Hide the outer layer and paint the shirt, trousers, hands and shoes. Check the back and sides too. Your character should still look intentional with no jacket.
- Switch the active painting target to Outer. Select the torso. Paint the jacket’s sides and back, leaving a clear opening down the front where the shirt shows.
- Add a collar or hem. Use a darker shade beneath the edge and a lighter shade on a small exposed rim. Two or three related shades are easier to control than dozens of scattered colors.
- Continue the sleeves. Work on each arm separately. Keep bare hands clear, and carry each cuff around the front, side and back of the wrist.
- Rotate the model. Look beneath the arms and at the back. Fix any stripe that stops unexpectedly at the edge of a face.
- Toggle the overlay off and on. The base should remain complete; the outer layer should add a recognizable jacket rather than cover accidental holes.
- Zoom out. If the collar disappears at normal character-preview size, simplify nearby details or increase its contrast. More pixels are not always more readable.
You can make a team version by keeping the same jacket shape and changing one accent: a shoulder stripe, cuff color or chest emblem. Give each player a distinct accent so matching outfits do not make everyone indistinguishable.
Keep the painting target separate from the preview
Many editors let you see the base while painting the outer layer. That is useful for lining up glasses with eyes or a cuff with a sleeve, but it also makes it easy to think a visible base pixel belongs to the overlay. Check which layer is active before painting or erasing.
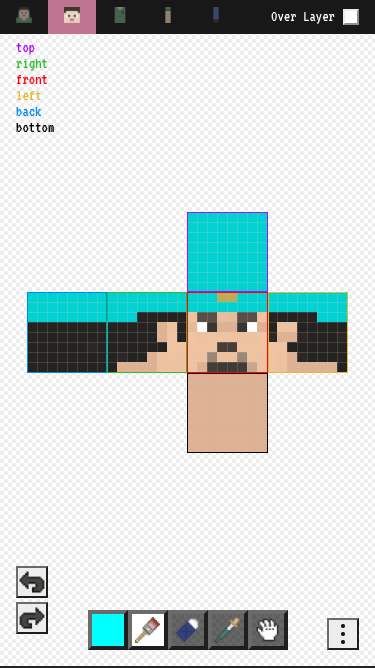
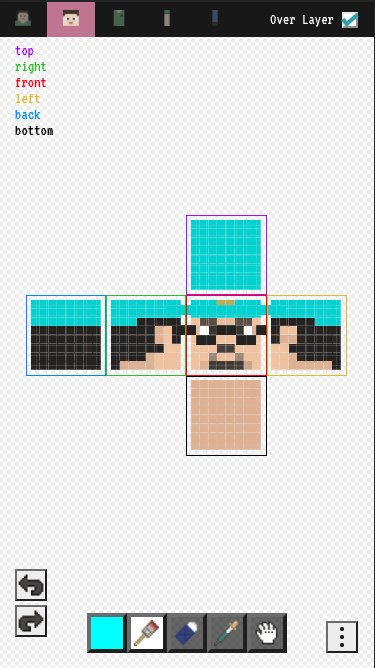
Unused outer-layer areas should remain transparent. Use the eraser on that layer to open gaps; painting a skin-colored pixel is not the same as making a hole through which the base can show. Keep the base complete instead of relying on transparency to remove ordinary body parts.
Ideas that work well at Minecraft scale
- Hair with a readable fringe: paint the full hairstyle on the base, then add a few outer-layer locks near the forehead and sides. Leave enough space around the eyes to keep the face readable.
- Glasses: start with a restrained frame and side arms. Empty areas can reveal the face underneath. Avoid depending on subtle transparency for a design that needs to look consistent across different clients.
- Hoodie or winter outfit: use the head overlay for a hood edge and the body overlay for collar and cuffs. Keep the original hair and shirt underneath so an alternate version remains easy to make.
- Explorer or builder: add a small raised chest pocket, strap edge or glove cuff. A contrasting tool-belt design on the base can keep the outfit recognizable even when extra layers are hidden.
- Roleplay uniform: reuse the same base colors, then give each role a simple emblem or trim. Test whether the symbol reads from more than one step away.
The standard outer layer only gives you the space around the existing body parts. It does not create a long waving cape, large wings, a separate backpack model or protective armor. A painted armor design changes your appearance, not your defense.
Make seams and shading look deliberate
Follow a stripe around the model instead of judging its disconnected pieces only on the flat texture. Check the shoulder tops, underside of the head, inside faces of arms and the backs of legs. These areas become visible when the character turns, walks or swings an arm.
Choose a consistent light direction for painted highlights, and use shadows to separate nearby parts rather than outlining every pixel in black. Keep a few large, clear color shapes. If the skin looks noisy at a distance, remove detail around its important features before adding more contrast. Our skin color and recoloring guide develops this into a practical palette.
A long graphic crossing from torso to arm will split when the arm moves. Treat that as part of the design: a shoulder patch or separate sleeve stripe is often more reliable than a picture that only joins up in a straight standing pose.
Apply the skin and check your outfit
Export the skin texture as a PNG, keeping the intended 64×64 dimensions and transparent overlay areas. Exporting the 3D preview or taking a screenshot will not give Minecraft the flat texture it needs.
Java: in the launcher’s Java Edition Skins tab, create a new skin, choose the matching Classic/Wide or Slim model, browse to your PNG, then save and use it. In the game’s Options → Skin Customization, check the relevant hat, jacket, sleeve and pants-layer switches if details are missing. These switches are useful for comparing a complete base outfit with its extra clothing.
Bedrock on Windows or mobile: use the Dressing Room’s Classic Skins import route and choose the correct arm model. A custom PNG is separate from Character Creator clothing. Console editions do not offer the same custom-PNG import route, and Bedrock imports should not be assumed to sync across devices. Our skin export and import guide covers the full workflow.
Look at the result from the front, back and sides in third person. Walk, crouch and move your arms, then try your usual armor: armor and capes can cover details that were clear in the editor. Judge the outfit in ordinary gameplay lighting as well as close-up preview.
Fix the common problems
| Problem | Useful correction |
|---|---|
| Hat or jacket disappears in game | Check that you exported the painted overlay and enabled its Java skin-layer switch. Confirm that the new skin is equipped. |
| A solid box covers the head | Erase unwanted outer-layer pixels. Check the active layer before clearing anything. |
| Sleeves have gaps or shifted edges | Match Classic/Slim between editor and game, then inspect all arm faces. |
| Face looks unfinished with the hat hidden | Restore the base face and underlying hair; keep only optional details on top. |
| Lines break at shoulders or sides | Rotate the preview and continue the pattern across the correct adjacent face. |
| Editor looks more three-dimensional than the game | Check whether the preview uses extruded pixels or special rendering beyond normal skin layers. |
Do you need 3D Skin Layers?
No mod is required to use a normal skin’s outer layer. The optional Java mod 3D Skin Layers changes how those existing pixels are rendered, giving them more depth on clients that use it. It cannot invent an overlay that you have not painted. Check your design in the normal style too, because other players may see it without that effect.
Sources and credits
MineBrush Editorial Team’s design exercises build on Minecraft Skin Editor 2D’s outer-layer explanation and original examples, Mojang’s model and skin-import guide, Mojang’s Character Creator FAQ and tr7zw’s 3D Skin Layers documentation. The three tutorial images date from June 2021 and retain the author’s artwork. The MineBrush cover is an editorial illustration, not a downloadable skin or an in-game screenshot.
More from MineBrush.
Make Your Own Minecraft Skin — Create a Classic or Slim character, paint an outfit, add readable shading and outer-layer details, then export your PNG and wear it in Java or Bedrock on Windows and mobile.
- Edition
- Cross-edition
- Difficulty
- Beginner
- Time
- Work at your own pace
Classic or Slim; Bedrock custom imports on Windows and mobile
MineBrush · Guide
Make Your Own Minecraft Skin
Make Your Own Minecraft Skin — Create a Classic or Slim character, paint an outfit, add readable shading and outer-layer details, then export your PNG and wear it in Java or Bedrock on Windows and mobile.
Classic or Slim; Bedrock custom imports on Windows and mobile
- Minecraft version
- 64×64 skins · Java and Bedrock Windows/mobile
- Game edition
- Cross-edition
- Platform family
- Cross-edition
- Supported devices
- Java on PC/Mac/Linux; Bedrock on Windows, Android and iOS
- Install format
- Create and export your own 64×64 PNG
- Touch readiness
- Check guide
- Resource type
- Guide
- Compatibility confidence
- Source claimed
- Card evidence statement
- Real editor captures and creator shading examples
- Card delivery statement
- Choose a model, paint an outfit and export PNG
- Card limitation note
- Classic or Slim; Bedrock custom imports on Windows and mobile
- Edition applicability
- Java + Bedrock
- Estimated time
- Work at your own pace
- Guide difficulty
- Beginner
- Delivery state
- No file
- Lifecycle state
- Current
Check Your Minecraft Skin — Find wrong arm models, unfinished sides and missing outer-layer details. Preview poses, check the skin in Minecraft and make clear images before sharing it.
- Edition
- Cross-edition
- Difficulty
- Beginner
- Time
- A short check
Fix visible problems before wearing or sharing your skin
MineBrush · Guide
Check Your Minecraft Skin
Check Your Minecraft Skin — Find wrong arm models, unfinished sides and missing outer-layer details. Preview poses, check the skin in Minecraft and make clear images before sharing it.
Fix visible problems before wearing or sharing your skin
- Minecraft version
- 64×64 skins · Classic and Slim
- Game edition
- Cross-edition
- Platform family
- Cross-edition
- Supported devices
- Java PC/Mac/Linux; Bedrock Windows, Android and iOS imports
- Install format
- Preview your own skin PNG in a browser and Minecraft
- Touch readiness
- Check guide
- Resource type
- Guide
- Compatibility confidence
- Source claimed
- Card evidence statement
- Actual editor capture and credited interface examples
- Card delivery statement
- Model, layers, poses and in-game appearance
- Card limitation note
- Fix visible problems before wearing or sharing your skin
- Edition applicability
- Java + Bedrock
- Estimated time
- A short check
- Guide difficulty
- Beginner
- Delivery state
- Direct download
- Lifecycle state
- Current
Not Enough Animations
1.12.4Make your character visibly eat, read maps, row and crawl in third person. Download Not Enough Animations 1.12.4 for Fabric 26.2 or NeoForge 26.1.2, see the author’s examples and choose the motions you like.
- Minecraft
- Java 26.2 (Fabric); 26.1.2 (NeoForge)
- Loader
- Fabric
- Runtime
- Client
Client only · choose the matching Minecraft version
Java · Mod
Not Enough Animations
Make your character visibly eat, read maps, row and crawl in third person. Download Not Enough Animations 1.12.4 for Fabric 26.2 or NeoForge 26.1.2, see the author’s examples and choose the motions you like.
Client only · choose the matching Minecraft version
- Minecraft version
- Java 26.2 (Fabric); 26.1.2 (NeoForge)
- Game edition
- Java Edition
- Loader / platform
- Fabric
- License
- tr7zw Protective License
- Platform family
- Java & PC
- Supported devices
- Windows · macOS · Linux
- Install format
- .jar mod file from the creator
- Touch readiness
- Not required
- Resource type
- Mod
- Project version
- 1.12.4
- Last verified at
- Sep 12, 2026
- Secondary guide action
- Setup & fixes
- Compatibility confidence
- Source claimed
- Java mod loader
- Fabric
- Java runtime side
- Client
- Card evidence statement
- Natural third-person actions for travel, survival and screenshots
- Required dependency
- Fabric API for Fabric; no separate library for NeoForge
- Card delivery statement
- Fabric 26.2 or NeoForge 26.1.2 · native downloads
- Card limitation note
- Client only · choose the matching Minecraft version
- Edition applicability
- Java
- Delivery state
- Direct download
- Lifecycle state
- Current
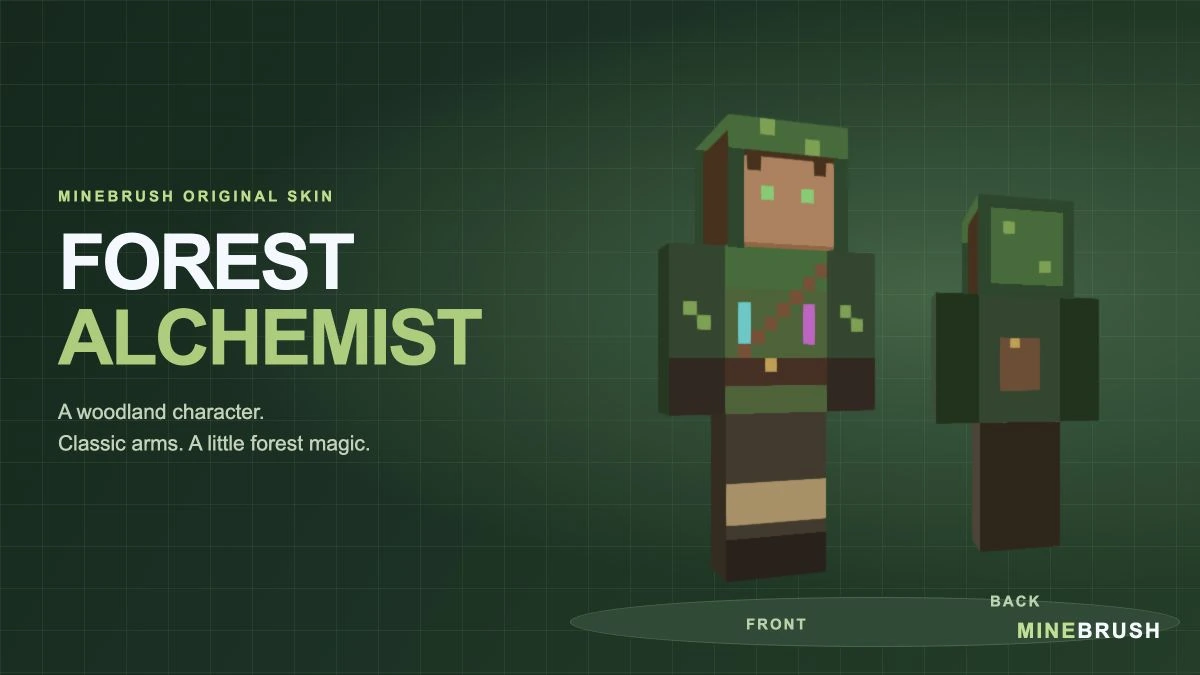
A woodland alchemist with a green hood, painted potion vials and a back satchel. See the real skin, compare the hood layer and download the Classic/Wide PNG in a ZIP.
- Model
- Classic (4 px arms)
- Texture
- 64×64 PNG
- Import
- Java Launcher; supported Bedrock Classic Skin import
Choose Classic / Wide; show the Hat layer for the complete hood
Minecraft · Skin
Forest Alchemist
A woodland alchemist with a green hood, painted potion vials and a back satchel. See the real skin, compare the hood layer and download the Classic/Wide PNG in a ZIP.
Choose Classic / Wide; show the Hat layer for the complete hood
- Minecraft version
- Classic / Wide skin import
- Game edition
- Cross-edition
- Loader / platform
- Not applicable
- License
- Original MineBrush design
- Skin model
- Classic (4 px arms)
- Platform family
- Cross-edition
- Supported devices
- Java Launcher; Bedrock local skin import on supported devices
- Install format
- ZIP containing a 64×64 PNG
- Touch readiness
- Not required
- Resource type
- Skin
- Last verified at
- Sep 14, 2026
- Compatibility confidence
- Source claimed
- Card evidence statement
- Model preview from the original PNG; no independent gameplay test
- Skin texture resolution
- 64×64 PNG
- Skin PNG validation
- Original 64×64 PNG; choose Classic / Wide
- Skin import scope
- Java Launcher; supported Bedrock Classic Skin import
- Skin preview status
- Model views from the downloadable skin
- Card delivery statement
- PNG inside ZIP · Classic / Wide
- Card limitation note
- Choose Classic / Wide; show the Hat layer for the complete hood
- Edition applicability
- Java + Bedrock
- Delivery state
- Direct download
- Lifecycle state
- Current
- Skin import route
- Java Launcher upload
- Skin texture
- 64x64 PNG validated
Player discussion 0
Questions, discoveries and help from other players.