
MineBrush publication
How to Check Your Minecraft Skin: Preview, Fixes and In-Game Appearance
Check Your Minecraft Skin — Find wrong arm models, unfinished sides and missing outer-layer details. Preview poses, check the skin in Minecraft and make clear images before sharing it.
A skin can look great from the front and still have a misplaced sleeve, an empty back or details that disappear in Minecraft. This guide helps you check your own skin before wearing or sharing it, find the cause of common visual problems and make a preview that shows what the character really looks like.
You need the skin’s PNG and a 3D editor such as PMCSkin3D. A mod is not required. Start in the browser, then take a quick look in the game you actually play. If you have not drawn the skin yet, use our skin-creation guide first.
The quick check before you play
- Open the exported PNG on its intended Classic or Slim model.
- Look at the front, back, sides, top and underside.
- Hide the outer layer, then restore it to check both parts of the design.
- Spread the arms and legs to find unfinished inner faces.
- Zoom out and check whether the face and main outfit still read clearly.
- Wear it in Minecraft, move around and try your usual armour or cosmetics.
You are looking for visible problems you can fix, not trying to make every pixel perfect. A simple, readable character often works better in normal play than a design whose identity depends on tiny decoration.
Start with the right PNG and arm model
Open a copy of the exported skin with File → Open file in PMCSkin3D. For a standard modern player skin, use the original 64×64 PNG. Do not inspect an enlarged screenshot or a JPEG of the character instead: those pictures are not the texture Minecraft wears.
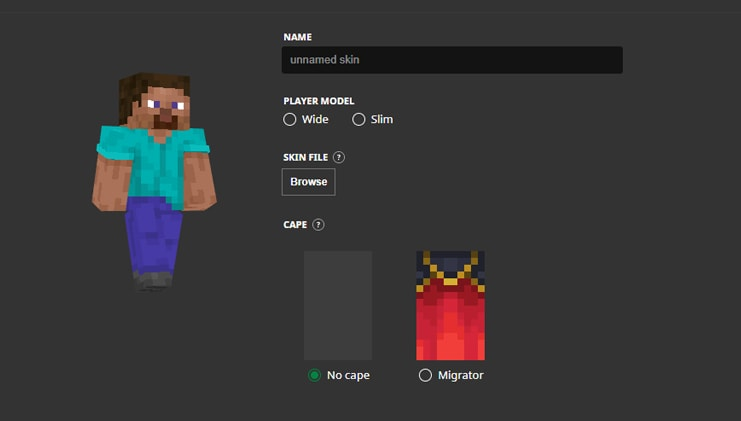
Select Steve/Classic/Wide for four-pixel-wide arms or Alex/Slim for three-pixel-wide arms. Use the creator’s stated model, or the one you chose while drawing. If the face and body look right but the arms have missing strips or shifted edges, check this choice before repainting anything.
Find unfinished faces and broken seams
Rotate the model instead of judging only the front. Follow a line that should continue around the body, such as a jacket hem, belt or boot edge. If it suddenly jumps up a pixel on the side, correct that face rather than shifting the entire outfit.
- Back: check hair, the jacket and any backpack or emblem. This is the view you often see in third person.
- Sides: check sleeves, cuffs and the join between front and back clothing.
- Undersides: inspect the chin, hands, shoes and surfaces hidden between arms and torso.
- Left and right limbs: keep deliberate differences, such as one glove or a knee patch; fix accidental reversed or missing details.
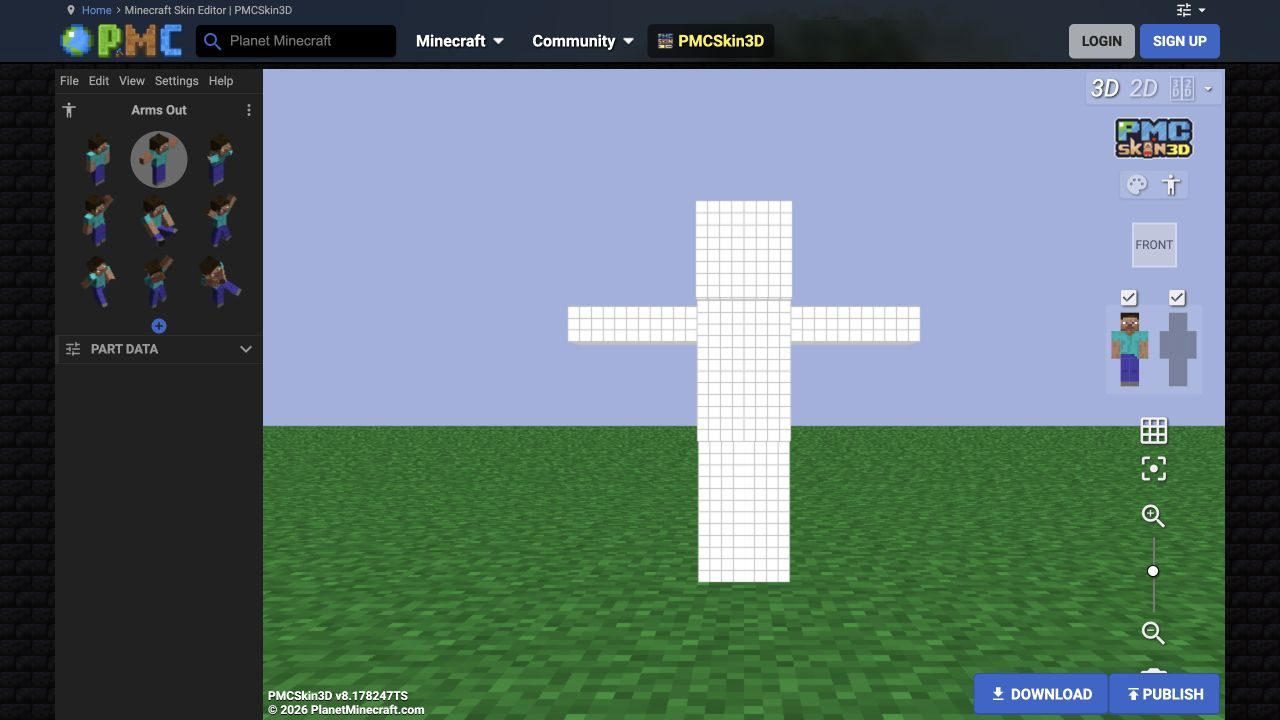
In PMCSkin3D’s Advanced editor, use the person-shaped Pose Model control and choose Arms Out. The arms move away from the torso, making the inner surfaces easier to inspect. Try a walking or running pose for the inner legs. You can also hide a body part that obstructs the view, then show it again before judging the finished character.
Check the base and outer layer separately
Hide the outer layer and look for holes, stray colours or unfinished areas in the base. Restore it and check whether the fringe, glasses, cuffs and jacket details sit where you intended. An unexpected coloured pixel on an otherwise transparent outer face can look like a floating speck.
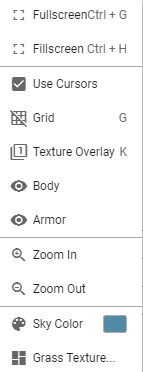
PMCSkin3D’s View → Body and View → Armor controls separate the two layers. Here, Armor means the skin’s outer layer; it does not equip an iron or diamond chestplate. Individual parts can also be controlled through the body/overlay visibility panel. Turn the grid off when judging the final appearance, then turn it back on if you need to locate a troublesome pixel.
Keep an eye on details that disappear with the overlay hidden. A fringe or raised collar can belong there; an otherwise missing face or shirt usually means you still need to finish the base. If the outer layer shows in the editor but not in Java, check Options → Skin Customization and enable the relevant hat, jacket, sleeve or trouser parts.
Make the design readable at normal size
Zoom out until the entire character fits comfortably on screen. Can you still find the face, understand the outfit and recognise your main detail? For a server uniform, a broad sleeve stripe is easier to identify than a single coloured button. For a personal character, hair shape and a scarf or collar can remain recognisable across several outfits.
Try the preview against both a light and a dark background; PMCSkin3D provides Sky Color in View. This can reveal hair merging into the background or a jacket whose sleeves are hard to distinguish. Change the lightness of an important boundary before adding more scattered pixels. Red and green alone are a poor way to distinguish two team skins: use different stripe positions, shapes or lightness too.
A background change is a drawing aid. The game’s lighting still needs a separate look, especially if you normally use shaders. Do not brighten every dark colour just because it disappears in one extremely dark scene.
Take a short look inside Minecraft
Apply the same PNG and model you inspected. In Java, use the Launcher’s Skins → New Skin flow and choose Save and Use. In Bedrock on Windows or mobile, use Dressing Room → Classic Skins and the import option. Console Bedrock does not support that custom-PNG import route.
Switch to third person. On a keyboard the default perspective key is F5; on some keyboards you may need Fn + F5. If it does something else, check the game’s perspective binding. Bedrock also offers camera perspective in Settings; Microsoft documents keyboard, controller and settings options in its camera guide.
- Stand and turn: inspect the face, back and sleeve edges in ordinary daylight.
- Walk and crouch: watch the inner legs, hands and collar for an unfinished strip that a neutral pose hid.
- Visit a shaded spot: check whether the main colours remain distinct in the lighting you normally play with.
- Put on your usual armour: see which parts of the skin remain visible. Armour covering your jacket is expected; use exposed face or hand details for recognition instead of repainting hidden clothing.
If you use 3D Skin Layers, compare the default appearance with the modded one. The mod gives outer-layer pixels extra depth and can return to ordinary rendering at distance. A difference caused by that renderer is not automatically a fault in the PNG. Server cosmetics can change the appearance too.
Fix the problem you can actually see
- One arm looks cut or shifted: match Classic/Slim first; inspect the arm texture after the model is correct.
- A bright line appears during movement: spread the limbs in the editor and paint the missing inner or adjoining face.
- Details look noisy: remove scattered pixels around the important colour blocks, then check the whole character again.
- Accessories vanish: check outer-layer visibility, game skin settings and any skin-rendering mod.
- The wrong skin appears: verify the chosen account/character slot, reselect the skin and rejoin. Check whether the server applies its own cosmetics.
Make a useful preview when you share it
Show one clear front view and one back or three-quarter view. Keep hands, feet and the top of the head inside the frame. Use a simple background, then look at the picture at the small size where people will actually see it. For a square avatar, frame the face and a little of the shoulders rather than shrinking the whole body until the expression disappears.
Keep the preview picture separate from the downloadable skin PNG. Explain whether the skin is Classic or Slim, credit its creator and state when a mod or shader changes the shown appearance. A viewer should be able to recognise the skin after installing it, without needing to reproduce a heavily edited promotional image.
Once you fix a cuff, overlay or model mismatch, export the revised PNG and reopen that file for the final look. This catches the easy mistake of inspecting a corrected editor project but sharing an older export.
Sources and credits
Practical review sequence by MineBrush. Editor tools and current Arms Out capture: Planet Minecraft / PMCSkin3D. Credited menu illustration: PsioPsia001. Skin import and model choice: Mojang’s skin guide; platform limits: Character Creator FAQ. Perspective controls: Microsoft Learn. Optional renderer behaviour: tr7zw’s 3D Skin Layers. The MineBrush cover is an editorial illustration; the article images are actual interface captures.
More from MineBrush.
Make Your Own Minecraft Skin — Create a Classic or Slim character, paint an outfit, add readable shading and outer-layer details, then export your PNG and wear it in Java or Bedrock on Windows and mobile.
- Edition
- Cross-edition
- Difficulty
- Beginner
- Time
- Work at your own pace
Classic or Slim; Bedrock custom imports on Windows and mobile
MineBrush · Guide
Make Your Own Minecraft Skin
Make Your Own Minecraft Skin — Create a Classic or Slim character, paint an outfit, add readable shading and outer-layer details, then export your PNG and wear it in Java or Bedrock on Windows and mobile.
Classic or Slim; Bedrock custom imports on Windows and mobile
- Minecraft version
- 64×64 skins · Java and Bedrock Windows/mobile
- Game edition
- Cross-edition
- Platform family
- Cross-edition
- Supported devices
- Java on PC/Mac/Linux; Bedrock on Windows, Android and iOS
- Install format
- Create and export your own 64×64 PNG
- Touch readiness
- Check guide
- Resource type
- Guide
- Compatibility confidence
- Source claimed
- Card evidence statement
- Real editor captures and creator shading examples
- Card delivery statement
- Choose a model, paint an outfit and export PNG
- Card limitation note
- Classic or Slim; Bedrock custom imports on Windows and mobile
- Edition applicability
- Java + Bedrock
- Estimated time
- Work at your own pace
- Guide difficulty
- Beginner
- Delivery state
- No file
- Lifecycle state
- Current
3D Skin Layers
1.11.2Give your skin’s hat, hair and clothing edges real depth with 3D Skin Layers. Download Fabric for Java 26.2 or NeoForge for 26.1.2, see the author’s example and learn how to fix missing layers or armor overlap.
- Minecraft
- Java 26.2 (Fabric); 26.1.2 (NeoForge)
- Loader
- Fabric
- Runtime
- Client
No NeoForge 26.2 release yet; client only.
Java · Mod
3D Skin Layers
Give your skin’s hat, hair and clothing edges real depth with 3D Skin Layers. Download Fabric for Java 26.2 or NeoForge for 26.1.2, see the author’s example and learn how to fix missing layers or armor overlap.
No NeoForge 26.2 release yet; client only.
- Minecraft version
- Java 26.2 (Fabric); 26.1.2 (NeoForge)
- Game edition
- Java Edition
- Loader / platform
- Fabric
- License
- tr7zw Protective License
- Platform family
- Java & PC
- Supported devices
- Windows · macOS · Linux
- Install format
- Place the matching JAR in the game instance’s mods folder
- Touch readiness
- Not required
- Resource type
- Mod
- Project version
- 1.11.2
- Last verified at
- Sep 5, 2026
- Secondary guide action
- Setup & fixes
- Compatibility confidence
- Source claimed
- Java mod loader
- Fabric
- Java runtime side
- Client
- Card evidence statement
- Give the outer layer of your existing skin more depth.
- Required dependency
- Fabric API for Fabric; no separate library for NeoForge
- Card delivery statement
- Fabric 26.2 and NeoForge 26.1.2 downloads on MineBrush
- Card limitation note
- No NeoForge 26.2 release yet; client only.
- Edition applicability
- Java
- Delivery state
- Direct download
- Lifecycle state
- Current
Player discussion 0
Questions, discoveries and help from other players.