
MineBrush publication
How to Save and Use Your Minecraft Skin: PNG, Models and Import
Take your custom outfit from the editor into Minecraft. Save the right PNG, match Classic or Slim arms, import it on your device and fix common skin problems.
Finished your Minecraft skin? Save the wearable texture, choose the matching arm model and try it on before sharing it. This guide takes your design from a skin editor into Java Edition or Bedrock on Windows and mobile. It also helps when Minecraft rejects the image, sleeves look wrong or your old appearance stays selected.
You can use this workflow for a first custom outfit, a winter version of your favourite character, matching team colours or a design you want to move from your computer to your phone. Keep each outfit as its own PNG so you can switch back later. If you have not painted a skin yet, start with our first-skin guide.
The quick route from editor to game
- Save your current design as a skin PNG using the editor’s download or export command.
- Remember whether you designed it for Classic/Wide or Slim arms.
- Reopen that saved file in a skin editor and rotate the character to check the export.
- In Java, use the Launcher’s Skins tab. In Bedrock on Windows or mobile, use Dressing Room → Classic Skins and the import option.
- Equip it, enter a world and check your appearance. Keep the PNG for future use or sharing.
Save the texture, not a picture of the character
A wearable skin is a tiny, flat image with the head, body and limbs laid out in separate areas. It looks like an unfolded character. A beautiful front-view render, a screenshot of the editor or a social-media preview cannot replace that texture.
In PMCSkin3D, choose File → Save to file. Its Take screenshot command makes a preview picture instead. Other skin editors may call the texture command Download or Export Skin. Look for the option that saves the skin itself as PNG.
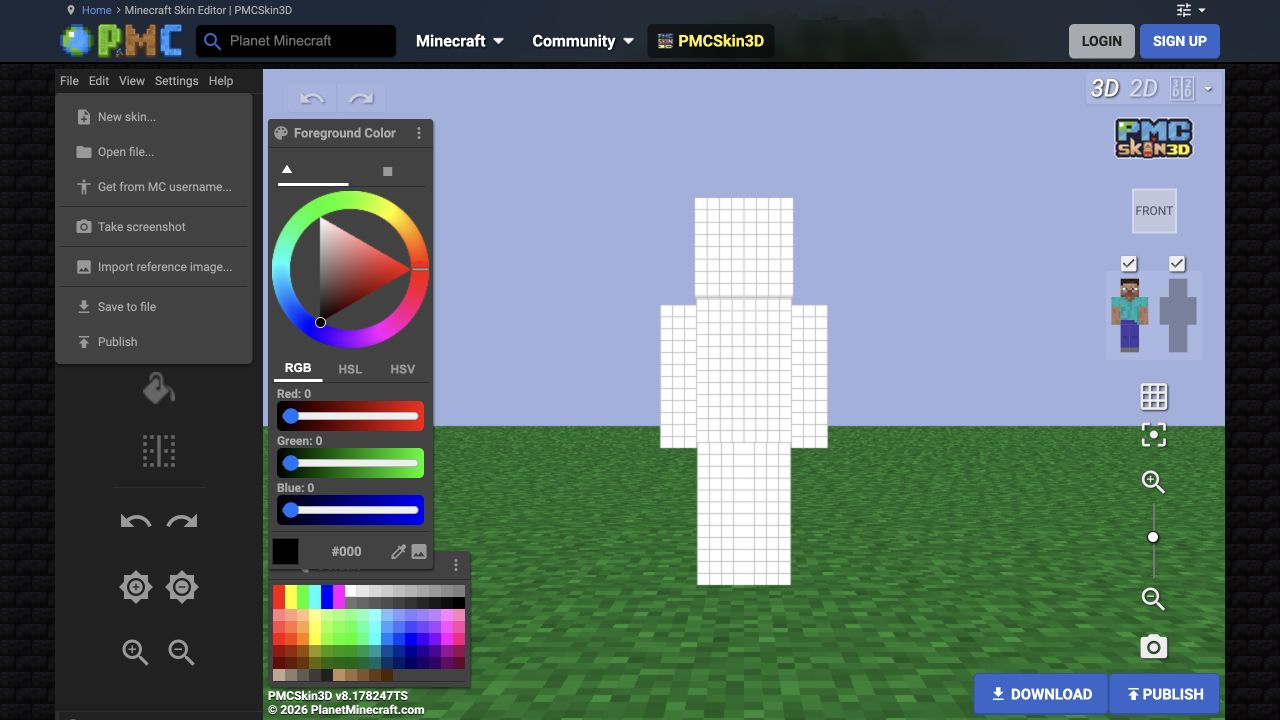
Use a normal player-skin layout
For a new skin intended for both Java and supported Bedrock devices, work with the ordinary 64×64 PNG player texture. Leave an editor’s HD option off when following this workflow. The dimensions describe the texture, not the size of a preview on your screen.
- Do not enlarge the PNG for sharper detail. Enlarging a texture does not add correctly placed skin pixels. Keep a large preview as a separate image.
- Do not stretch an old 64×32 texture into a square. Its body-part layout needs a proper skin-editor conversion; stretching moves the artwork into the wrong places.
- Do not turn a JPEG into a PNG by renaming it. Export again from the skin editor. A normal image conversion also cannot turn a character screenshot into an unfolded texture.
- Keep transparent gaps on the outer layer where you intended them. Avoid flattening the texture onto a white background in a photo app. Check the base body separately for accidental missing areas.
Save a recognisable name such as forest-explorer-slim.png. For a different outfit, use a new name rather than overwriting your favourite version. If your editor offers a separate project backup, keep that too; the PNG is the copy you can import and carry between devices.
Match Classic and Slim before fixing the artwork
Classic/Wide has four-pixel-wide arms; Slim has three. Use the same model when painting, reopening and equipping the skin. If a sleeve has a strange stripe or missing edge, check the model choice before repainting it. Switching models can require adjusting the arm artwork.
There are two different uses of the word “Classic”: Bedrock’s Classic Skins section is the place for whole-body texture skins. It does not mean every skin in that section must use wide arms. The arm-model choice is a separate decision.
Reopen the file you just saved
Use the editor’s Open file command and select the PNG from your saved folder. Preserve any unsaved work before opening another file. This simple check catches an older download selected by mistake and a preview image saved instead of the texture.
Look at the front, back and sides. Rotate under the arms and between the legs, where unfinished pixels are easy to miss. Toggle the outer layer off and on: the base should still look intentional, while a hood, cuff or jacket edge should appear in the appropriate layer. Our skin preview guide goes deeper into movement, seams and readability.
Wear it in Java Edition
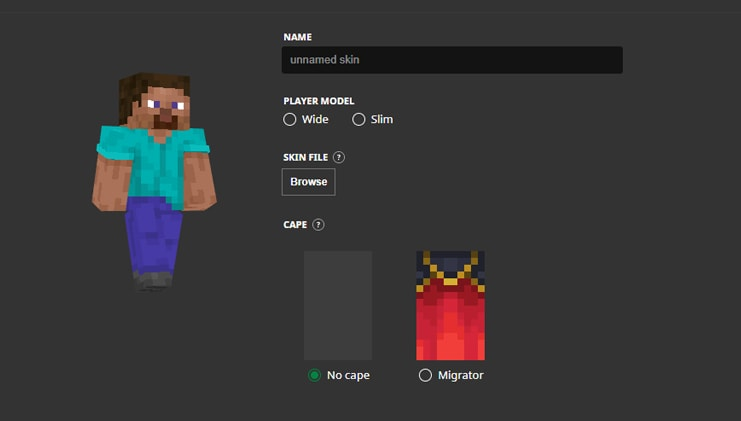
- Open the Minecraft Launcher and select Minecraft: Java Edition → Skins → New Skin.
- Name the entry, choose Classic/Wide or Slim to match your design, and browse for the exported PNG.
- Check the preview, then choose Save & Use.
Wear it in Bedrock on Windows or mobile
Open Dressing Room and choose the character slot you want to change. Enter Classic Skins, look under Owned for Import, then choose Choose New Skin. Select the saved PNG and the matching arm model. Menu grouping can vary with the game version.
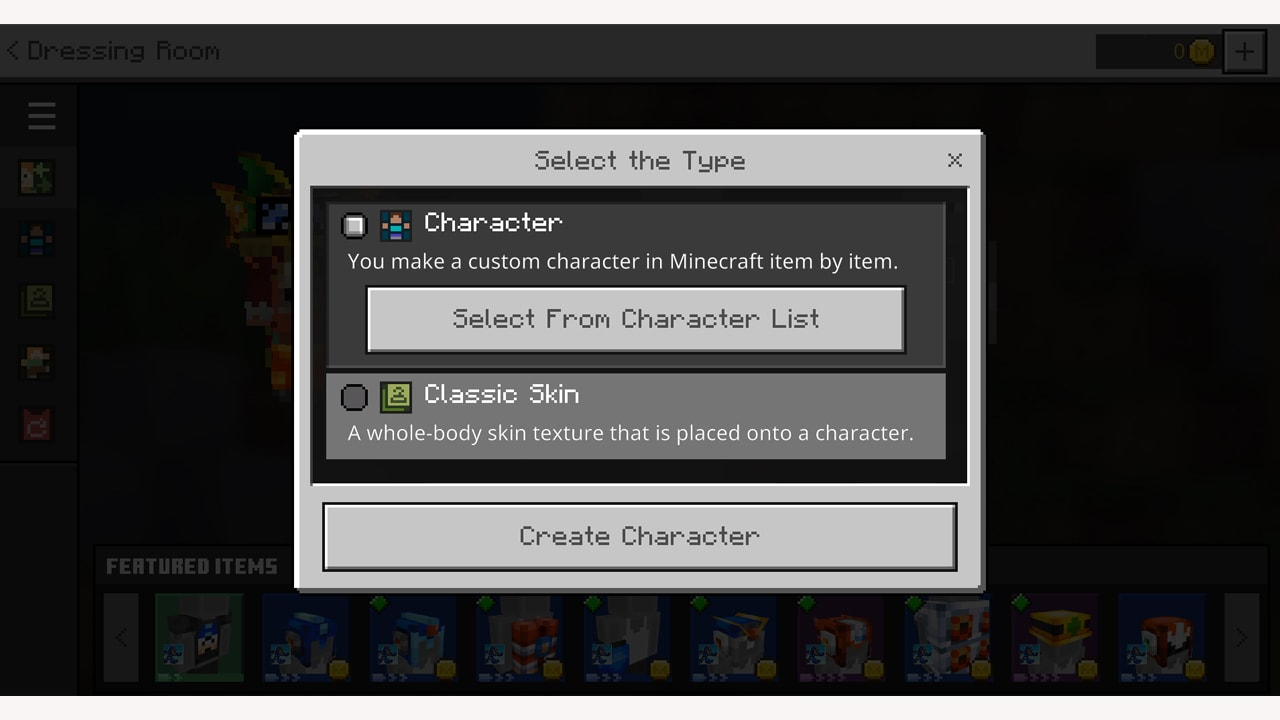
Moving from a computer to a phone? Transfer the PNG as an original file. Download it onto the phone before opening the picker, and remember which folder or photo library you used. Sending only a chat preview or taking a screenshot can leave you with the wrong image.
Custom PNG import is supported on Windows and mobile, but the same route is not available on consoles. Importing it on a phone does not automatically carry it to a console: Bedrock custom skins do not sync between devices. Keep the file so you can import it again on another supported device. These platform limits are explained in Mojang’s Character Creator FAQ.
Check the outfit in a world
Enter a familiar world and switch to a third-person view using your platform’s camera controls. Stand in daylight, turn around and walk a few steps. Check the sleeves, trouser seams, back design and outer-layer details. Armour can hide much of the outfit, so remove it briefly somewhere safe if you want to inspect the full design.
If you made team outfits, compare them together: can you still tell each player apart? Give each person a different accent or emblem while keeping the shared colour scheme. For a seasonal outfit, check that the face and main identifying detail still read clearly. Our skin colour guide helps with readable palettes and recolouring.
Fix the problem you actually see
- “Invalid skin” or rejected image: reopen the file in a skin editor. Confirm it is the exported player texture with the intended dimensions, then export a fresh PNG. A render, WebP, JPEG or stretched image needs correcting at the source.
- The file is missing from the phone picker: finish the download, locate the saved PNG and check which folders or photos the picker can access. A website preview is not necessarily a downloaded file.
- Broken sleeve edges: compare the selected arm model with the model used in the editor. Change that choice before editing individual pixels.
- Hat, jacket or cuffs disappeared: check whether those details are painted on the outer layer and whether the relevant skin-layer options are enabled in your game.
- The previous outfit remains: confirm the equipped skin and account in Java, or the selected character slot in Bedrock. Rejoin the world after applying the change. If it happens only on one server, check whether that server changes player appearances.
- You see your skin but a friend does not: their Bedrock trusted-skin setting can affect custom-skin visibility. Ask them to check their own preference; changing your PNG is not always the solution.
- No usable import option on a console: use its supported Dressing Room or Marketplace choices. Renaming a PNG or importing it on a phone does not add console PNG support.
Share something your friend can actually use
Send the original skin PNG and a short note saying Classic/Wide or Slim. Add a front-and-back preview if you want to show the outfit clearly, but keep it separate from the wearable file. Tell your friend which edition you used when checking it, rather than assuming a preview proves it works everywhere.
For example: “Forest Explorer — Slim arms. The attached PNG is the skin; the larger image is a preview. I wore it in Java. On Bedrock, import the PNG through Classic Skins on Windows or mobile.” Change the last sentence to reflect what you actually tried.
Keep the creator’s name and source link when sharing an adapted or downloaded design. If you publish a recolour, explain your changes and follow the original creator’s sharing terms. That helps other players find both the original artist and your variation.
Sources and tools
- Planet Minecraft — PMCSkin3D editor and export help.
- Mojang — skin models, Java import and the official screenshots.
- Mojang — custom-skin platform support and device syncing.
- Mojang — Classic Skins import route introduced with Character Creator.
- Microsoft Learn — skin textures and trusted-skin troubleshooting.
More from MineBrush.
Make Your Own Minecraft Skin — Create a Classic or Slim character, paint an outfit, add readable shading and outer-layer details, then export your PNG and wear it in Java or Bedrock on Windows and mobile.
- Edition
- Cross-edition
- Difficulty
- Beginner
- Time
- Work at your own pace
Classic or Slim; Bedrock custom imports on Windows and mobile
MineBrush · Guide
Make Your Own Minecraft Skin
Make Your Own Minecraft Skin — Create a Classic or Slim character, paint an outfit, add readable shading and outer-layer details, then export your PNG and wear it in Java or Bedrock on Windows and mobile.
Classic or Slim; Bedrock custom imports on Windows and mobile
- Minecraft version
- 64×64 skins · Java and Bedrock Windows/mobile
- Game edition
- Cross-edition
- Platform family
- Cross-edition
- Supported devices
- Java on PC/Mac/Linux; Bedrock on Windows, Android and iOS
- Install format
- Create and export your own 64×64 PNG
- Touch readiness
- Check guide
- Resource type
- Guide
- Compatibility confidence
- Source claimed
- Card evidence statement
- Real editor captures and creator shading examples
- Card delivery statement
- Choose a model, paint an outfit and export PNG
- Card limitation note
- Classic or Slim; Bedrock custom imports on Windows and mobile
- Edition applicability
- Java + Bedrock
- Estimated time
- Work at your own pace
- Guide difficulty
- Beginner
- Delivery state
- No file
- Lifecycle state
- Current
Check Your Minecraft Skin — Find wrong arm models, unfinished sides and missing outer-layer details. Preview poses, check the skin in Minecraft and make clear images before sharing it.
- Edition
- Cross-edition
- Difficulty
- Beginner
- Time
- A short check
Fix visible problems before wearing or sharing your skin
MineBrush · Guide
Check Your Minecraft Skin
Check Your Minecraft Skin — Find wrong arm models, unfinished sides and missing outer-layer details. Preview poses, check the skin in Minecraft and make clear images before sharing it.
Fix visible problems before wearing or sharing your skin
- Minecraft version
- 64×64 skins · Classic and Slim
- Game edition
- Cross-edition
- Platform family
- Cross-edition
- Supported devices
- Java PC/Mac/Linux; Bedrock Windows, Android and iOS imports
- Install format
- Preview your own skin PNG in a browser and Minecraft
- Touch readiness
- Check guide
- Resource type
- Guide
- Compatibility confidence
- Source claimed
- Card evidence statement
- Actual editor capture and credited interface examples
- Card delivery statement
- Model, layers, poses and in-game appearance
- Card limitation note
- Fix visible problems before wearing or sharing your skin
- Edition applicability
- Java + Bedrock
- Estimated time
- A short check
- Guide difficulty
- Beginner
- Delivery state
- Direct download
- Lifecycle state
- Current
Choose Your Skin Colours — Give your Minecraft character a clear style. Build a small palette, try ready-to-copy outfit colours and recolour a skin without losing its shading.
- Edition
- Cross-edition
- Difficulty
- Beginner
- Time
- Work at your own pace
Keep the shading when changing colours
MineBrush · Guide
Choose Your Skin Colours
Choose Your Skin Colours — Give your Minecraft character a clear style. Build a small palette, try ready-to-copy outfit colours and recolour a skin without losing its shading.
Keep the shading when changing colours
- Minecraft version
- Classic and Slim player skins
- Game edition
- Cross-edition
- Platform family
- Cross-edition
- Supported devices
- PC and mobile skin editors
- Install format
- Browser editor and your skin PNG
- Touch readiness
- Check guide
- Resource type
- Guide
- Compatibility confidence
- Source claimed
- Card evidence statement
- Colour controls and real creator examples
- Card delivery statement
- Outfit palette and practical recolouring
- Card limitation note
- Keep the shading when changing colours
- Edition applicability
- Java + Bedrock
- Estimated time
- Work at your own pace
- Guide difficulty
- Beginner
- Delivery state
- No file
- Lifecycle state
- Current
Player discussion 0
Questions, discoveries and help from other players.